Using artefacts
Use artefacts as methods to visualise, experiment and progress your content design. They'll add rigour to your process. And they're a great way to collaborate with others.
Why use artefacts?
Your artefact will help to bring the right focus - whether you're working solo, experimenting with a team member, or bringing in an subject matter expert (SME).
Later you can show them off on your walls and share them in your showcase. They promote not only your progress but the way you work.
Mapping your content
Where to start? With the user every time.
Content design is less about copy writing and more about designing an experience. You will be mapping out your user's path first.
Mapping your content helps you and others to direct a flow of content for the user need.
Setting up
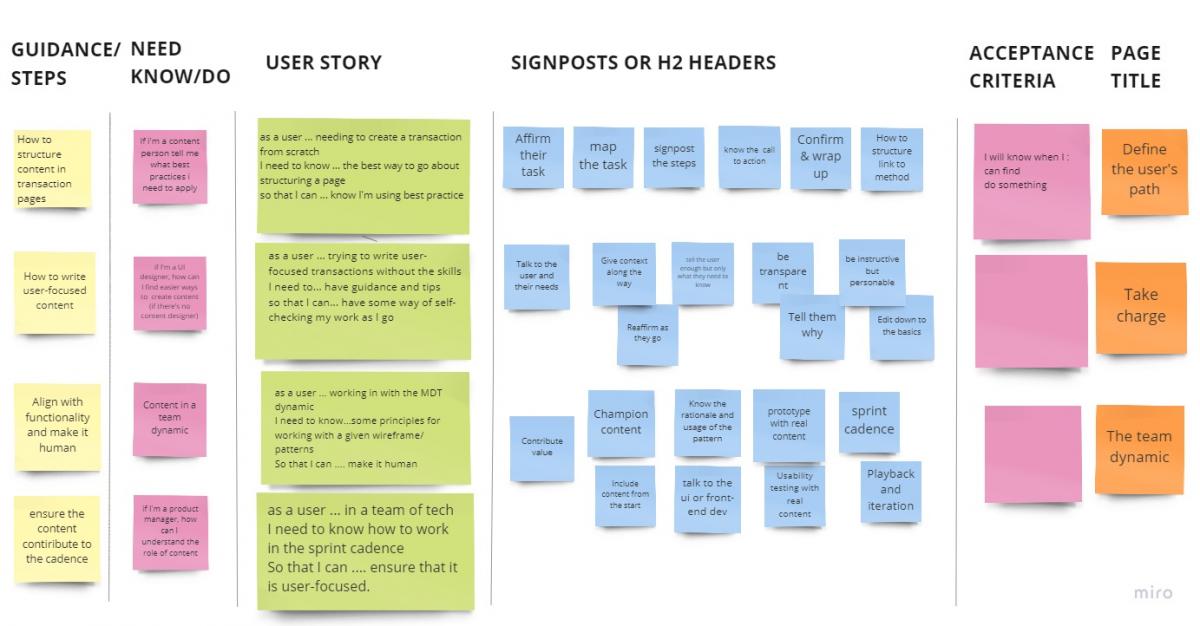
All you need is a wall space and post-it notes and sharpies. You can be as sketchy as you like. If you prefer, use a virtual equivalent with something like a miro board. This will work well if you're both working remotely.
First, draw up the below horizontal headings. Start to build a user scenario from left to right.
- User (if I'm a … how can I…)
- Guidance or steps (how to…do something)
- User tasks as H2 signposts (use verbs to direct the user)
- User story (write these up from the first three columns)
- Acceptance criteria (to fulfil your user story)
- Page title (note this is the very last thing you will be defining).
Use different colour post-it notes for under each heading. Try to keep words on the post-its brief. Use phrases instead of sentences.
Come prepared
As you add post-it notes, think about:
- the user's goals and pain points
- how you might help them to progress from start to finish
- what best practice or policy might apply.
Experimenting
You will be experimenting and defining as you go. But this approach gives structure to your high-level exploration.
There's no right or wrong way. Don't overthink things. Make a start and you'll see. It's a persuasive way of working. And hugely collaborative.
What you write on your post-it notes will direct the user and set the tone for them. This is where you begin to use words, but in a minimal way. You will be connecting with the user by being instructive and personable.
User-focused content design process

Synthesising
You may have come up with a lot of users and user stories between you. That's good. There's no limit. To synthesise:
- First check back on your task column. You may find you've repeated tasks across the different user scenarios. If so, start to group post-it notes that are similar. Reorder and prioritise tasks if they need it. This should give you a feel for how you might direct the user through a task. This will be your page's table of contents.
- Next, go back to your user stories and refine them, or even rewrite them if you need to. If you need to combine user stories and have less, that's okay. This will be what you write to.
- It's also a good time to identify where some of the content might already exist elsewhere. In that case you won't need to develop content for them. They can be links.
- Now you can write up your acceptance criteria. Use it to validate that the user can check off the intent of the tasks for each user scenario.
- Once you've done this, you will know what your page titles are. They're not set, and you can always improve on them as you write your content.
- Finally, draw up a simple map of your page structure in relation to a landing page or website.
Next steps
- Take a pic of your artefact to socialise.
- Transfer your structure map, page title, user story, table of contents and acceptance criteria to a Word doc.
- Write up the first sentence or two for each page. They should encapsulate the user need you are covering off.
- Now that you and your SME have bonded over this process, on behalf of the user, you're ready to start pair writing.